
eTouch
for Health...
Tips and Special Features
|
|
|
eTouch
for Health... |
|
|
|
||||
|
|
||
|
eTip-007 Creating Sessions with Muscle Sets to Match IKC Books I and II |
||
|
The IKC TFH Books I and II present the Touch for Health muscles in groups for TFH Levels II and III that are neither the primary 14 meridians or the full 42-TFH muscle set. The eTouch for Health session wizard creates 14, 42-muscle sets plus many other special sets. In this tip, we will show how to use the built-in capabilities of eTouch so that each muscle set can be easily created by both instructors or students. The basic technique is to create a new person's record and name the person 'Training Demonstration' or something similar. Then, create a session for each group of muscles, mark them all inhibited and then close the session. Later, when the group is needed, use the 'Duplicate Session' feature in the Session Wizard and voila!...you have a new session with only the muscles that you need in the group! This assists both instructors and students as the new muscles are presented and as the students practice while using just the muscles that are in the group. We will make this a standard feature in the future, but for now, this is a good workaround. Touch for Health I Muscles (14 primary meridians) Note: you will notice that Supraspinatus, Teres Major and Abdominals are repeated in the sets for Level II & III. In the Level III muscles there are also four others that repeat. Therefore, you will end up 17 Level II muscles and 20 Level III muscles in your sets. In eTouch, there is only one Abdominals record and it includes Rectus, transverse and oblique, so in Level II and III, add Abdominals each time. Touch for Health II Muscles - Meridians: (17 muscles in session) 1. Supraspinatus - Central Touch for Health III Muscles - Meridians: (20 muscles in session) 1. Supraspinatus - Central Touch for Health IV Muscles (all 42 muscles) |
I. Create a New Personal Record 1. Create new Personal Record as normal 2. Name the 'New Person': Training Demonstration
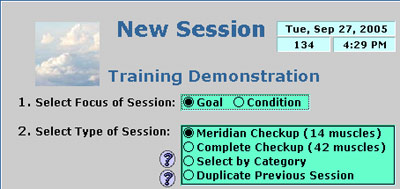
3. You will now use this record for creating four new sessions. II. Create Level I Muscles 1. Create a New Session:
a. Select Focus of Session: Goal b. Select Type of Session: Meridian Checkup (14 Muscles)
c. For Goal, enter: "TFH Level 1 Muscles" or something similar
d. Continue as normal as if this were a real session. 2. Enter a result for all 14 muscles. This step is very important! Later, when we duplicate a session, it will only duplicate muscles that were marked inhibited. The easiest way is to click one of the bilateral buttons (colored dots) and then click the 'Next" button to progress.
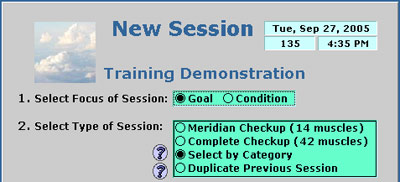
3. Close the session as normal (Leave Muscles / No Report) Create Level II Muscles (17) 1. Create new Session 2. Select Focus of Session: Goal 3. Select Type of Session: Select by Category (we will individually select the muscles for the set)
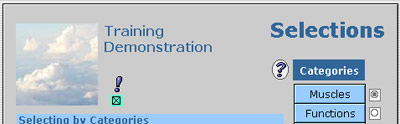
4. For the Goal, enter: "TFH Level II Muscles" 5. Continue as normal until you reach the 'Selections Menu' 6. Click the 'Muscles' button
7. Add the Level II muscles shown at left. Note: You add muscles by clicking on their name. Some muscles are located on the front and some on the back, so click on the Orange Front and Back buttons to switch between views and then make your selection. For example, Supraspinatus and Teres Major are located on the back and they are the first two that you choose. These are repeated in each session because they are on the Central and Governing meridians and it is important to balance these in every session. Use the orange Front and Back Muscles buttons to change views.
Note: If you add a muscle by mistake, simply click on its name in the list on the right and it will be removed from your session. 8. Click the 'Return to the Selections' button when you are done adding the muscles to the session. 9. Click the: Continue button which will create your session. 10. Enter a result for all 14 muscles. This step is very important! Later, when we duplicate a session, it will only duplicate muscles that were marked inhibited. 5. Close the session as normal (Leave / No Report) |
|
|
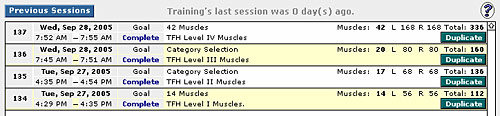
Create Level III Muscles (20) 1. Repeat the steps for Level II Muscles but use the Level III Muscles on the left. You will end up with 20 eTouch muscles in your session. Create Level IV Muscles 1. Create a New Session and use the Goal / 42 Muscles options and repeat steps as before. Using These Later in Training Sessions Now that you have created sessions for each of the TFH training levels, you can go the personal record of your example 'Training Demonstration'. You will now see the sessions listed in the personal summary screen of your demonstration record as shown below. |
||
 |
||
|
Notice that on the screen there are Duplicate buttons. These can be used to create a new session that uses just the muscles of the training level that you choose.
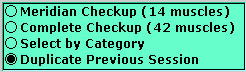
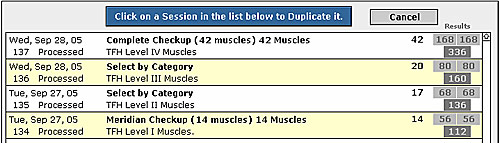
The reports are displayed in most recent chronological order. As you add more sessions, these sessions will remain at the bottom of your list. Another way to duplicate a session is to create a new session and then select the Duplicate Previous Session option.
When using this option, all Closed sessions for the person logged in are displayed. Note that if you leave a session open, it will not be displayed in the list. You select a session by clicking on it in the list as shown below. |
||
 |
||
|
Once the new session is created, it can be used just as any other session. For instructors, this is a handy way to teach the muscles in sets as they have been defined in the IKC TFH Training Books. For students, it is a great way to learn while in class and practicing. For students that must turn in reports for their balances, the eTouch reports work great for turning into the instructor.
Good luck! |
||
|
|
||