 |
|
 |
eTouch
for Health... |
|
|
|
||||
| Return to Tips Menu | |||
|
|
|||
|
eTip-001 |
Setting Tester Options to personalize eTouch for the Tester. | ||
|
Purpose:
|
If you find that you are using specific features when creating sessions in eTouch, then you can set Tester Options for many of the features. Some of these options can be set from the Main Menu while others can be set during a session. |
||
|
|
|||
|
1. |
Login the Tester
|
Note:
People are designated as a Tester by simply setting the Tester? flag to
'Yes'. This is located on your personal record summary just after your
last name. |
|
|
2.
|
Go to the Personal Record of the Tester | Click the People button or click the Tester's name in Login Box. | |
|
3.
|
Click
the Tester Options button |
||
|
4.
|
Set Preferences | There are multiple
preferences that can be selected for the tester. These can be changed
at any time to finetune your style. The specific information about the
Tester's experience and education is also accessed from this screen. Each
Tester should customize their own information if Agreements are used.
|
|
 |
|||
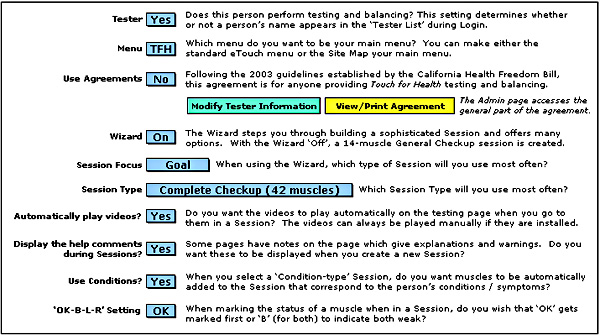
| Automatically playing videos when going to a testing screen is very handy in a training and learning situation, but you may not want to wait for the video to run when you go to this page later as you are more experienced, so you have the option to run or not. Displaying help comments about eTouch on the screen is an option that can also be toggled. Turning them off cleans up some screens and this option is mainly for screen asthetics. The 'OK-B-L-R' option is another personal option. When setting the results of testing, 'B' is for bilateral/both while 'L' is for left side and 'R' is for right side. Choosing which order you like here is truly a personal preference. | |||
|
©Laser Solutions, Inc.
|
|||